Upper-Body Bodyweight Exercises
27. Push-Ups
- Position your hands in a way that when looked from above, your arms look like an arrow, rather than the letter T. It’s safer for your shoulders and produces greater muscle activation.
- Contract your core and don’t let your hips sag, causing you to go into anterior pelvic tilt.
- Don’t do half reps – use the full range of motion. Bring Sally all the way up and all the way down!
28. Knee Push-Ups
The set up for a knee push up is very much like the set up for any other push up – hands are placed slightly wider than shoulder-width, the core is engaged and tight, you bend the elbows and lower your upper body until your chest touches the ground. The only obvious difference is that you are on your knees and thus moving less weight. It doesn’t really matter if you keep your legs like mine or just rest them on the ground – just go with whatever is more comfortable for you.
Five progressions to your first push-ups
29. Feet-Elevated Push-Ups
If you find regular push-ups too easy, here’s an interesting variation that makes them much more challenging.
Simply place your feet on an elevated surface and keep the rest of the setup the same.
Don’t let your hips sag!
Related read:
5 At-home Dumbbell workouts to get stronger and leaner
30. Pike Push-Ups
Starting position is very much like the Downward-facing dog yoga pose, although you are only at your toes. Bend your arms and try to keep your elbows close to your body, rather than them going sideways (like a T-form). Keep your spine straight and your neck neutral. Follow the same pathway and return to starting position. You are gonna feel the exercise mostly in your shoulders and triceps. It’s an extremely challenging exercise!
Sculpted Arms at Home: No Equipment Upper Body Workout
31. Spiderman Push-Ups
Yet another advanced push-up variation.
You start in a high plank position, lower yourself into a push-up, and draw your left knee towards your left elbow.
Return back to starting position and repeat on the other side.
32. Diamond Push-Ups
Put your hands together so that your thumbs and index fingers form a triangle and place them under your chest.
Lower yourself down while keeping a neutral spine.
Keep your elbows close to your body and push yourself up.
33. Hand-Release Push-Ups
Very much like your regular push-up but you go all the way down to the ground.
Lift your hands off the floor for a second and push yourself back up to your starting position.
Related read:
10 Abs exercises better than sit-ups – 6 for back pain relief
34. Bodyweight Dips
Whether you’re doing dips on a chair or a dip station they are a very effective bodyweight exercise to train your triceps and shoulders.
Keep your torso as close to the chair as possible and don’t let your elbows flare out to the sides – point them directly behind you. The further you stretch your legs forward, the more challenging the exercise (because you have to push more of your weight up). You’re definitely gonna feel the burn at the back of your arms!
Sculpted Arms at Home: No Equipment Upper Body Workout
35. Bodyweight Back Extensions
Lie face down on the ground.
Bend your elbows at 90 degrees, thumbs pointing up.
Lift your upper body up by squeezing your shoulder blades together.
For added tension, lift your legs and squeeze your glutes as well.
36. Kipping Handstand Push-Ups
This is quite an advanced bodyweight exercise but if that’s getting too easy, you can always move on to strict handstand push-ups.
Start on with your hands extended and leaned against a wall.
Slowly lower yourself down until your head touches the ground.
Elbows move forward while descending.
Flex your legs into a tucked position and then rapidly extend your hips and legs.
Using that motion, press with your arms.
Related read:
The 15 Best Dumbbell Exercises for beginners (with Video)
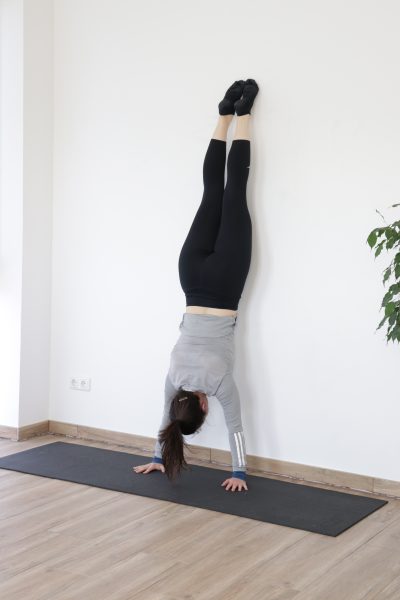
37. Handstand Hold

Handstand holds are a very effective way to build up your strength for handstand push-ups or any pressing exercise for that matter.
38. Shoulder Taps
Yet another exercise starting with a plank position and yet another time I will remind you to keep your core tight.
From there on it’s pretty straightforward – you just tap your shoulders with the opposite hand. Don’t let your shoulders or hips sag!
View as a Google Web Story